
Sunday Lunch: Crusty loaf with homemade ricotta cheese & Balsamic-Roasted Cherry Tomatoes
- Home Table

- Nov 23, 2023
- 4 min read
Updated: Jan 11, 2024

We love Sundays. Our favorite day to celebrate in togetherness, we recently embarked on a delightful culinary adventure gifted to us in the form of a cheese-making kit from Woolworths – a thoughtful housewarming present from dear friends.
Inspired by the newfound treasure in our hands, we decided to make it a Sunday filled with creativity and flavor. The mission: crafting a crusty loaf to complement our homemade ricotta cheese and balsamic-roasted cherry tomatoes.
There's an undeniable magic in the simplicity of baking bread. As the kitchen filled with the aroma of our homemade creation, we couldn't resist the simple pleasure of spreading butter on a slice, still warm from the oven, and enjoying the delightful way it melted into the crust.
Our journey took an exciting turn as we delved into the world of cheese making, particularly the surprisingly simple yet immensely rewarding process of crafting our own ricotta. Infused with the sweet and spicy notes of the included sweet chili spice, the ricotta became a canvas for flavors.
Impressed by the simplicity and adaptability of crafting ricotta, we committed to making it a regular tradition in our kitchen. And as the sweet, tangy scent of balsamic-roasted cherry tomatoes mingled with the aroma of freshly baked bread, our Sunday unfolded into a symphony of tastes and textures.
Join us in savoring the joy of Sundays, where every meal becomes a celebration of shared moments and delectable flavors. Happy Sunday, indeed! 🌞🍞🧀
Crusty loaf
Ingredients
1 packet instant yeast
1 cup warm water
2 TB sugar
Salt
Flour
Directions
MIX THE DOUGH & FIRST RISE (1 HOUR):
Combine yeast, sugar, and warm water in a large mixing bowl
Let the yeast proof for about 5 minutes, until the mixture is foamy.
Add flour to bowl. Mix with a sturdy spatula until the dough starts to come together, then add salt and mix until all ingredients are incorporated. For best results, mix until no dry bits of flour remain. Note: This is a relatively slack (wet) dough, so it may seem a bit shaggy and sticky at this point. Don't worry - it will become more smooth and elastic as we go!
Cover bowl with a clean tea towel and let rise on the counter for about 1 hour, until dough has doubled in size.


SHAPE THE DOUGH & FINAL RISE (30 MIN):
When dough has risen, lightly flour a large cutting board.
Tip the dough out of the bowl and onto the cutting board. DO NOT PUNCH THE DOUGH DOWN - you want to keep all those nice air bubbles intact so you have an airy, delicious loaf of bread. (Note: If the dough is sticking to the bowl a little bit, wet your hand with a bit of cold water and gently separate the dough from the bowl to get it all out).
Shape the dough into a round loaf: Pull each corner of the dough in towards the center (like you're folding an envelope) and repeat until the dough feels tight and begins to resist your folds. Flip the dough over and pull it into a round loaf.
Flour a proofing basket or a medium bowl and place your loaf into it seam-side down. Cover with a tea towel and let rise another 30 minutes or so while you preheat the oven. Note: I like to line my proofing basket or mixing bowl with a clean linen napkin to distribute the flour more evenly and help with cleanup.


HEAT THE OVEN :
While bread is rising, place an empty Dutch oven (with the lid on) in your oven and heat to 460 degrees Fahrenheit.


BAKE!
When the oven is hot, you're ready to go! Use oven mitts to pull the Dutch oven out and remove the lid.
Lay a piece of parchment paper down on your counter or cutting board (optional - it makes transferring the bread easier!)
Tip your bread dough gently out of the proofing basket onto the parchment paper. Make sure the seam side is up this time - this is what will create those beautiful cracks on top of the bread!
VERY CAREFULLY (without burning yourself!) use the sides of the parchment to lift the bread up and place it into the hot Dutch oven.
Put your oven mitts back on, place the Dutch oven lid back on the pot, and slide the whole thing back into your hot oven.
Cook bread for 30 minutes.
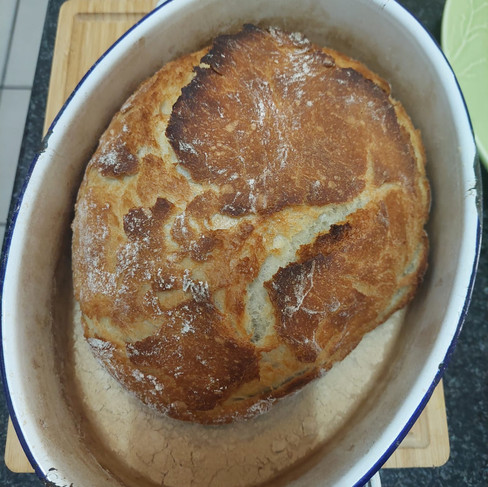
After 30 minutes, remove the lid from your Dutch oven. The bread should be taller, crusty, and very lightly browned. Continue cooking the bread, uncovered, for 10-15 minutes more until the bread has deepened in color and you have a beautiful brown crust.
When bread is done, use oven mitts to pull the pot out of your oven.
Use a long spatula or the corners of your parchment paper to lift the bread out of the Dutch oven and onto a cooling rack. Let cool for at least 30 minutes before cutting into it.
Slice, slather with butter, and enjoy!


Balsamic-Roasted Cherry Tomatoes
Ingredients
2 pounds cherry tomatoes
2 garlic cloves, minced
2 tablespoons balsamic vinegar
2 tablespoons olive oil
Kosher salt
Freshly ground black pepper
1 tablespoon chopped oregano leaves
Balsamic Vinegar
Fresh Basil leaves
Directions
Preheat the oven to 375°F. Toss together the tomatoes, garlic, vinegar, and olive oil on a large rimmed baking sheet. Season with salt and pepper. Roast for 20 to 25 minutes, until the tomatoes are tender. Remove from the oven and stir in the oregano.


Home-made Ricotta Cheese
Ingredients
8 ½ cups whole milk
⅓ cup lemon juice
1 teaspoon salt (Optional)
Directions
Pour milk into a saucepan set over medium heat. Heat milk until it registers 194 degrees F (90 degrees C) on an instant-read thermometer, about 5 minutes. Remove from heat.
Stir lemon juice and salt slowly into warmed milk. Let stand until milk curdles, 10 to 15 minutes.


3. Line a fine-mesh strainer with cheesecloth and place it over a large bowl. Pour milk mixture carefully into the lined strainer. Let stand until most of the liquid has drained off the ricotta, about 15 minutes. Discard drained liquid.
4. You can mix in some flavorings into the cheese, we used a sweet chilli spice mix.


Enjoy
Serve with fresh basil and a drizzle some of the Balsamic reduction from roasting the tomatoes on top.
We sat on out patio enjoying the spring sun, and enjoying a little Rose wine with our prepared meal.

Happy cooking ❤️🍅🍃🍞


Comments